3. Before You Begin
Before using THOR for the first time, read this section to understand what is required to use THOR effectively.
3.1. Licensing
THOR requires a valid license to run. After you
Generate a License, place the license file
in the THOR program folder. THOR scans the program folder and all
subfolders for valid license files (*.lic). Alternatively, you can
specify a search path with --licensepath <path>. For details, refer
to About License Files. For automation
purposes, THOR also supports
License Injection via Environment.
Tip
THOR can also retrieve licenses from our licensing portal or from a local ASGARD Management Center. See License Retrieval for more information.
3.1.1. Generate a License
You can generate a valid license in our customer portal.
Navigate to Contracts & Licenses > My Contracts and select the
appropriate contract type to generate a new license. Use either
THOR Workstation or THOR Server & Workstation as the license
type.
The following overview shows which license type to use:
THOR Workstation: host-based THOR scanner license for Windows workstations and macOS only. It cannot be used on Windows servers or Linux systems, regardless of their role. Usage on legacy systems such as Windows XP requires the
legacyoption.THOR Server & Workstation: host-based THOR scanner license for scans on workstations and servers running Windows, Linux, or macOS. Usage on legacy systems such as Windows 2003 or Windows 2008 before R2 requires the
legacyoption.
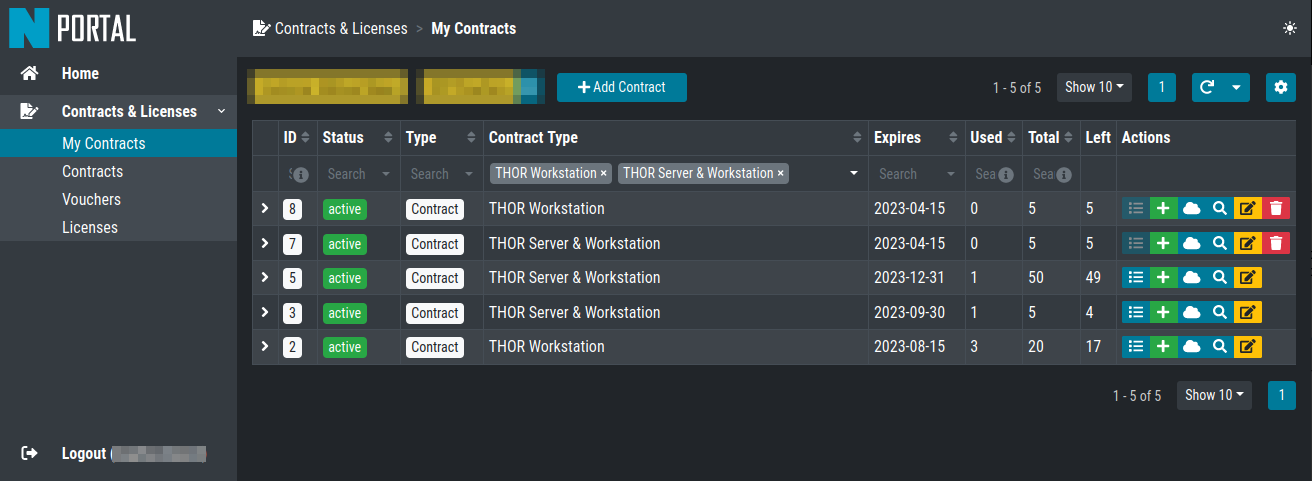
Contract Overview in the Portal
Click the green Plus icon for your contract and fill in all
required fields. After clicking Check Hostnames, you can issue the
license if all hostnames are unique and valid.

Generate a License in the Portal
To generate a license, use the hostname of the system on which THOR
will run. On Windows, use the computername as the hostname during
license creation:
C:\Users\nextron>echo %COMPUTERNAME%
WIN11-TESTING
On Linux, use the hostname command:
nextron@unix:~$ hostname
unix
On macOS use the following command:
MacBook:~ nextron$ sysctl kern.hostname
MacBook
Additional notes on hostname values:
Use only the hostname part of an FQDN (master1 from master1.internal.net)
Letter casing does not matter (case-insensitive)
We do not store hostnames in the portal
After you issue the license, your browser opens the Licenses
section of the portal. There you can see all licenses issued for the
contract you just used. You can download a single License, a
License Bundle containing all selected licenses in one ZIP file, or
a Software + License Bundle containing the correct THOR version
together with your license(s). To see licenses across all contracts,
remove the filter at the top labeled Contract: xyz.
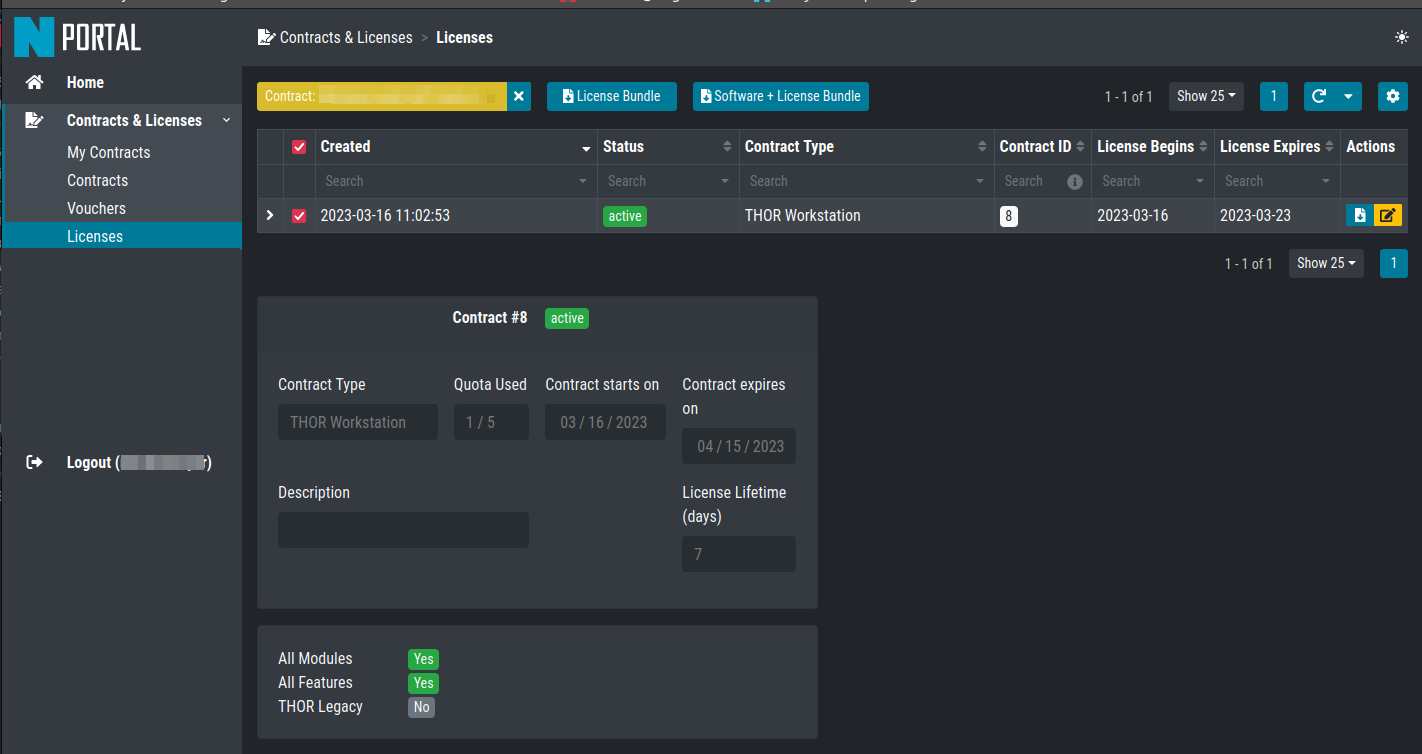
Licenses Overview in the Portal
3.1.2. About License Files
THOR scans its program folder and all subfolders for valid .lic
files and uses the first valid license it finds.
This behavior simplifies rollouts with the host-based license model.
You can generate licenses for many systems, store them in a subfolder
named licenses (for example thor-system1.lic,
this-system2.lic, ...), and distribute the THOR program folder
with that subfolder to all licensed systems. On each system, you can
then simply run thor64.exe. There is no limit to the number of
license files that can be placed in this folder.
This allows you to prepare one USB drive for all systems or provide a network share with one THOR copy that already includes all required licenses. Another use case is THOR Remote, which requires a license for every remote system you plan to scan.
3.1.3. License Injection via Environment
Instead of using license files, you can provide a specific license through THOR's execution environment. This is particularly useful for automation, for example if THOR runs inside a container.
Use a valid license file and store its content as a base64-encoded
string in the THOR_LICENSE environment variable:
Linux
nextron@unix:~$ export THOR_LICENSE=$(base64 < /path/to/thor.lic)
Windows
$env:THOR_LICENSE = [Convert]::ToBase64String([System.IO.File]::ReadAllBytes("C:\path\to\thor.lic"))
Then run THOR as usual.
3.2. Upgrade THOR and Update The Signatures
Run the following command to update THOR and its signatures:
Windows:
C:\nextron\thor>thor-util.exe upgrade
Jan 10 09:24:20 win11-testing THOR_UTIL: Info: Read configuration from C:\nextron\thor\config\thor-util.yml

    ________ ______  ___    __  ______________
   /_  __/ // / __ \/ _ \  / / / /_  __/  _/ /
    / / / _  / /_/ / , _/ / /_/ / / / _/ // /__
   /_/ /_//_/\____/_/|_|  \____/ /_/ /___/____/

   Copyright by Nextron Systems GmbH, 2023
   v1.11.0+thor10.7.20

Jan 10 09:24:20 win11-testing THOR_UTIL: Info: Starting Upgrade Process
Jan 10 09:24:20 win11-testing THOR_UTIL: Info: License file found OWNER: Rick Roll TYPE: client STARTS: 2022/08/09 EXPIRES: 2023/08/09
Jan 10 09:24:20 win11-testing THOR_UTIL: Info: Downloading 'thor-win'
Jan 10 09:24:20 win11-testing THOR_UTIL: Info: Downloading from: https://update1.nextron-systems.com/[...]
Jan 10 09:24:20 win11-testing THOR_UTIL: Info: already up-to-date
Jan 10 09:24:20 win11-testing THOR_UTIL: Info: THOR 10 detected, also updating signatures ...
Jan 10 09:24:20 win11-testing THOR_UTIL: Info: Starting Upgrade Process
Jan 10 09:24:20 win11-testing THOR_UTIL: Info: License file found OWNER: Rick Roll TYPE: client STARTS: 2022/08/09 EXPIRES: 2023/08/09
Jan 10 09:24:21 win11-testing THOR_UTIL: Info: Downloading 'signatures'
Jan 10 09:24:21 win11-testing THOR_UTIL: Info: Downloading from: https://update1.nextron-systems.com/[...]
Jan 10 09:24:21 win11-testing THOR_UTIL: Info: downloaded package as zip
Jan 10 09:24:28 win11-testing THOR_UTIL: Info: Successfully upgraded from Signatures 23.1.5-122954 to Signatures 23.1.9-153938
Linux:
nextron@unix:~/Documents/thor$ ./thor-util upgrade
Jan 10 09:33:10 unix THOR_UTIL: Info: Read configuration from /home/nextron/Documents/thor/config/thor-util.yml

    ________ ______  ___    __  ______________
   /_  __/ // / __ \/ _ \  / / / /_  __/  _/ /
    / / / _  / /_/ / , _/ / /_/ / / / _/ // /__
   /_/ /_//_/\____/_/|_|  \____/ /_/ /___/____/

   Copyright by Nextron Systems GmbH, 2023
   v1.11.0+thor10.7.20

Jan 10 09:33:10 unix THOR_UTIL: Info: Starting Upgrade Process
Jan 10 09:33:10 unix THOR_UTIL: Info: License file found OWNER: Rick Roll TYPE: client STARTS: 2023/01/10 EXPIRES: 2023/08/14
Jan 10 09:33:10 unix THOR_UTIL: Info: Downloading 'thor-linux'
Jan 10 09:33:10 unix THOR_UTIL: Info: Downloading from: https://update1.nextron-systems.com/[...]
Jan 10 09:33:11 unix THOR_UTIL: Info: already up-to-date
Jan 10 09:33:11 unix THOR_UTIL: Info: THOR 10 detected, also updating signatures ...
Jan 10 09:33:11 unix THOR_UTIL: Info: Starting Upgrade Process
Jan 10 09:33:11 unix THOR_UTIL: Info: License file found OWNER: Rick Roll TYPE: client STARTS: 2023/01/10 EXPIRES: 2023/08/14
Jan 10 09:33:11 unix THOR_UTIL: Info: Downloading 'signatures'
Jan 10 09:33:11 unix THOR_UTIL: Info: Downloading from: https://update1.nextron-systems.com/[...]
Jan 10 09:33:11 unix THOR_UTIL: Info: already up-to-date
We strongly recommend updating THOR before running it for the first time, because the downloaded package or the included signatures may already be out of date.
Note
The upgrade requires a valid license for the host that performs the
update. If you do not want to use a regular license on that host,
ask us for a silent license. It can be used for testing purposes
and also allows THOR and signature updates.
3.3. Define an Antivirus / EDR Exclusion
Because THOR accesses process memory and probes for suspicious mutexes, named pipes, and event values, we recommend excluding THOR from antivirus and EDR scanning.
Adding such exclusions can also significantly reduce runtime, because access to process memory and files is no longer intercepted.
Note
We have seen major runtime increases with Windows Defender since April 2021 (+50-100%). When using Windows Defender, we strongly recommend excluding THOR from scanning.
The quickest way to add an exclusion on a single system is to use the
following command. Adjust the path in -ExclusionProcess as needed.
Windows command line:
C:\Users\nextron>powershell -ep bypass -Command "Add-MpPreference -ExclusionProcess 'c:\temp\thor\thor64.exe'"
PowerShell:
PS C:\Users\nextron> Add-MpPreference -ExclusionProcess 'c:\temp\thor\thor64.exe'
For more information, see the Microsoft documentation.
3.3.1. A Note on SentinelOne
On systems running SentinelOne, process memory may contain suspicious
strings introduced by the product itself. The most common false
positive is related to the keyword ReflectiveLoader, but other
rules may also match.
It is unclear how SentinelOne modifies the memory of many system
processes. We cannot generally exclude these signatures from the scan.
Be aware that results from the ProcessCheck module on a system
running SentinelOne may contain many false positives.
3.3.2. A Note on McAfee
Defining THOR exclusions across all relevant McAfee services is not straightforward. You need to exclude the process in multiple sections (AV, EDR, On-Access). We have compiled a list of recommended exclusions, which you can find here.
3.4. Grant Full Disk Access on macOS
THOR requires Full Disk Access (FDA) for some data like Mail, Messages and certain administrative settings for all users, while scanning macOS, although THOR itself must be executed with administrative privileges.
You can grant FDA to Terminal (as executing application) on demand while scanning,
by allowing access when prompted. Alternatively, you can grant access before, to perform
the scan unattended. Please keep in mind that also administrative privileges on the
machine are needed to perform this change.
To do this, navigate on your Mac to System Settings > Privacy & Security > Full Disk Access:
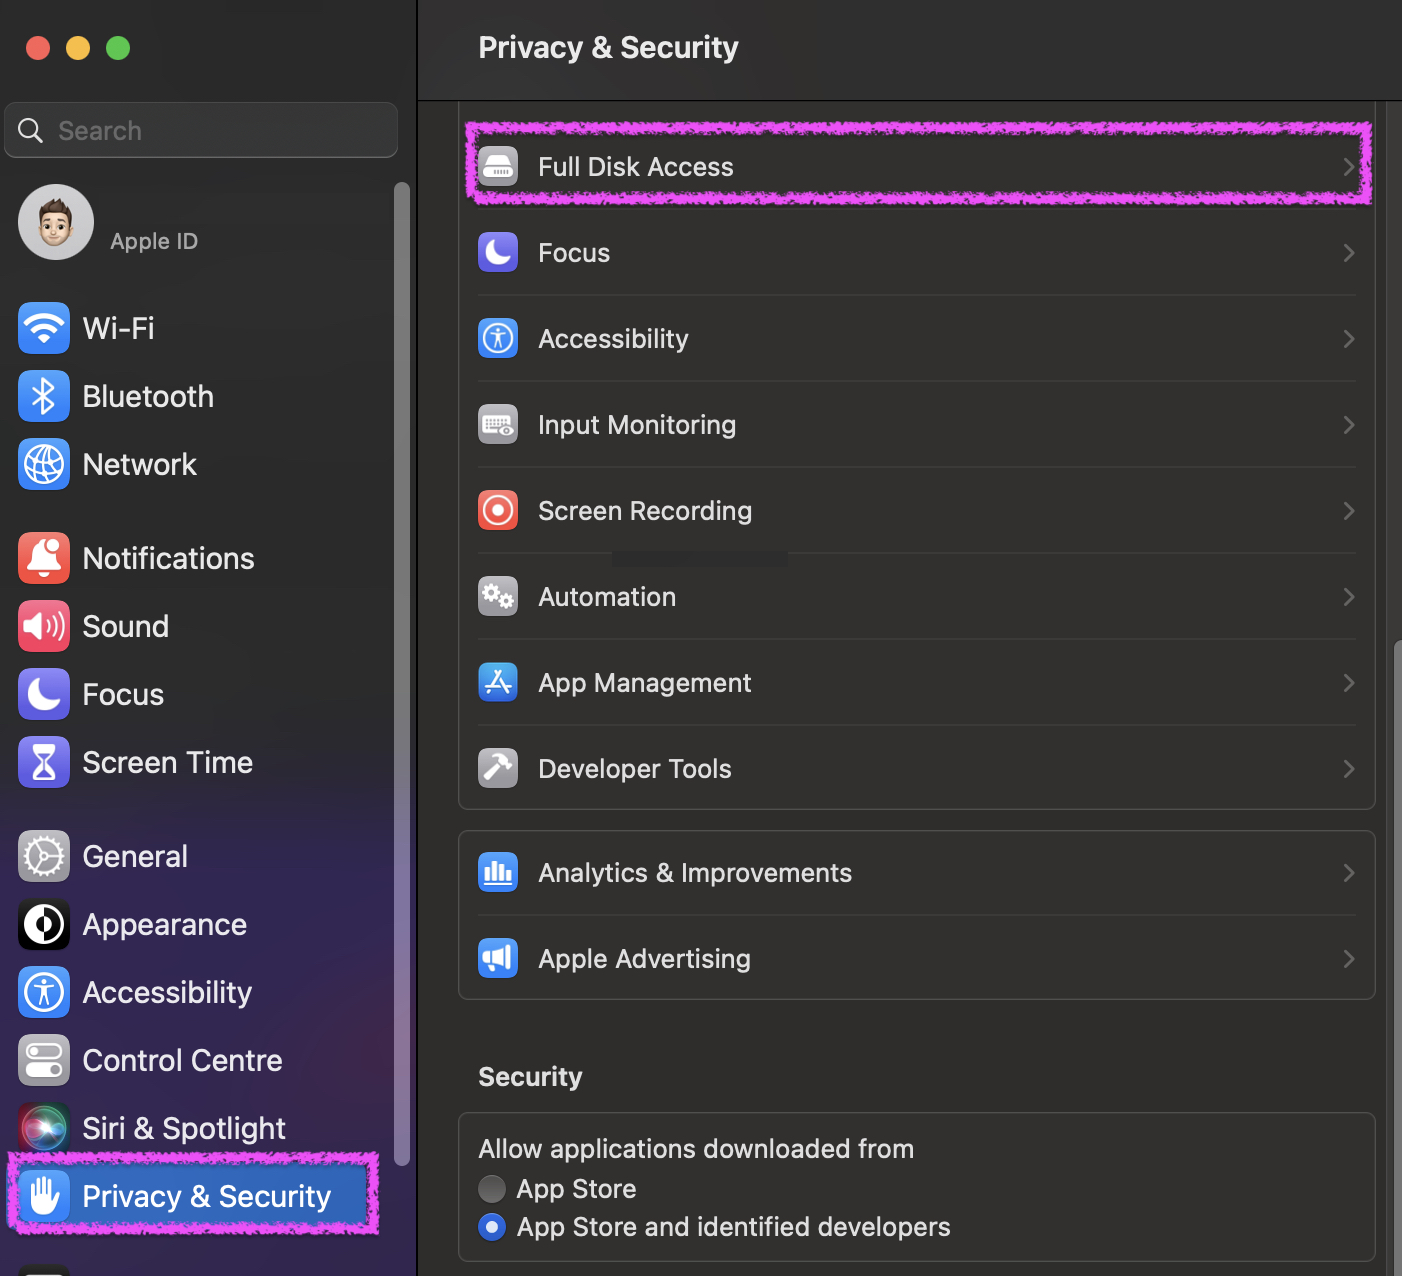
System Settings View
You need to add Terminal to the listed application.
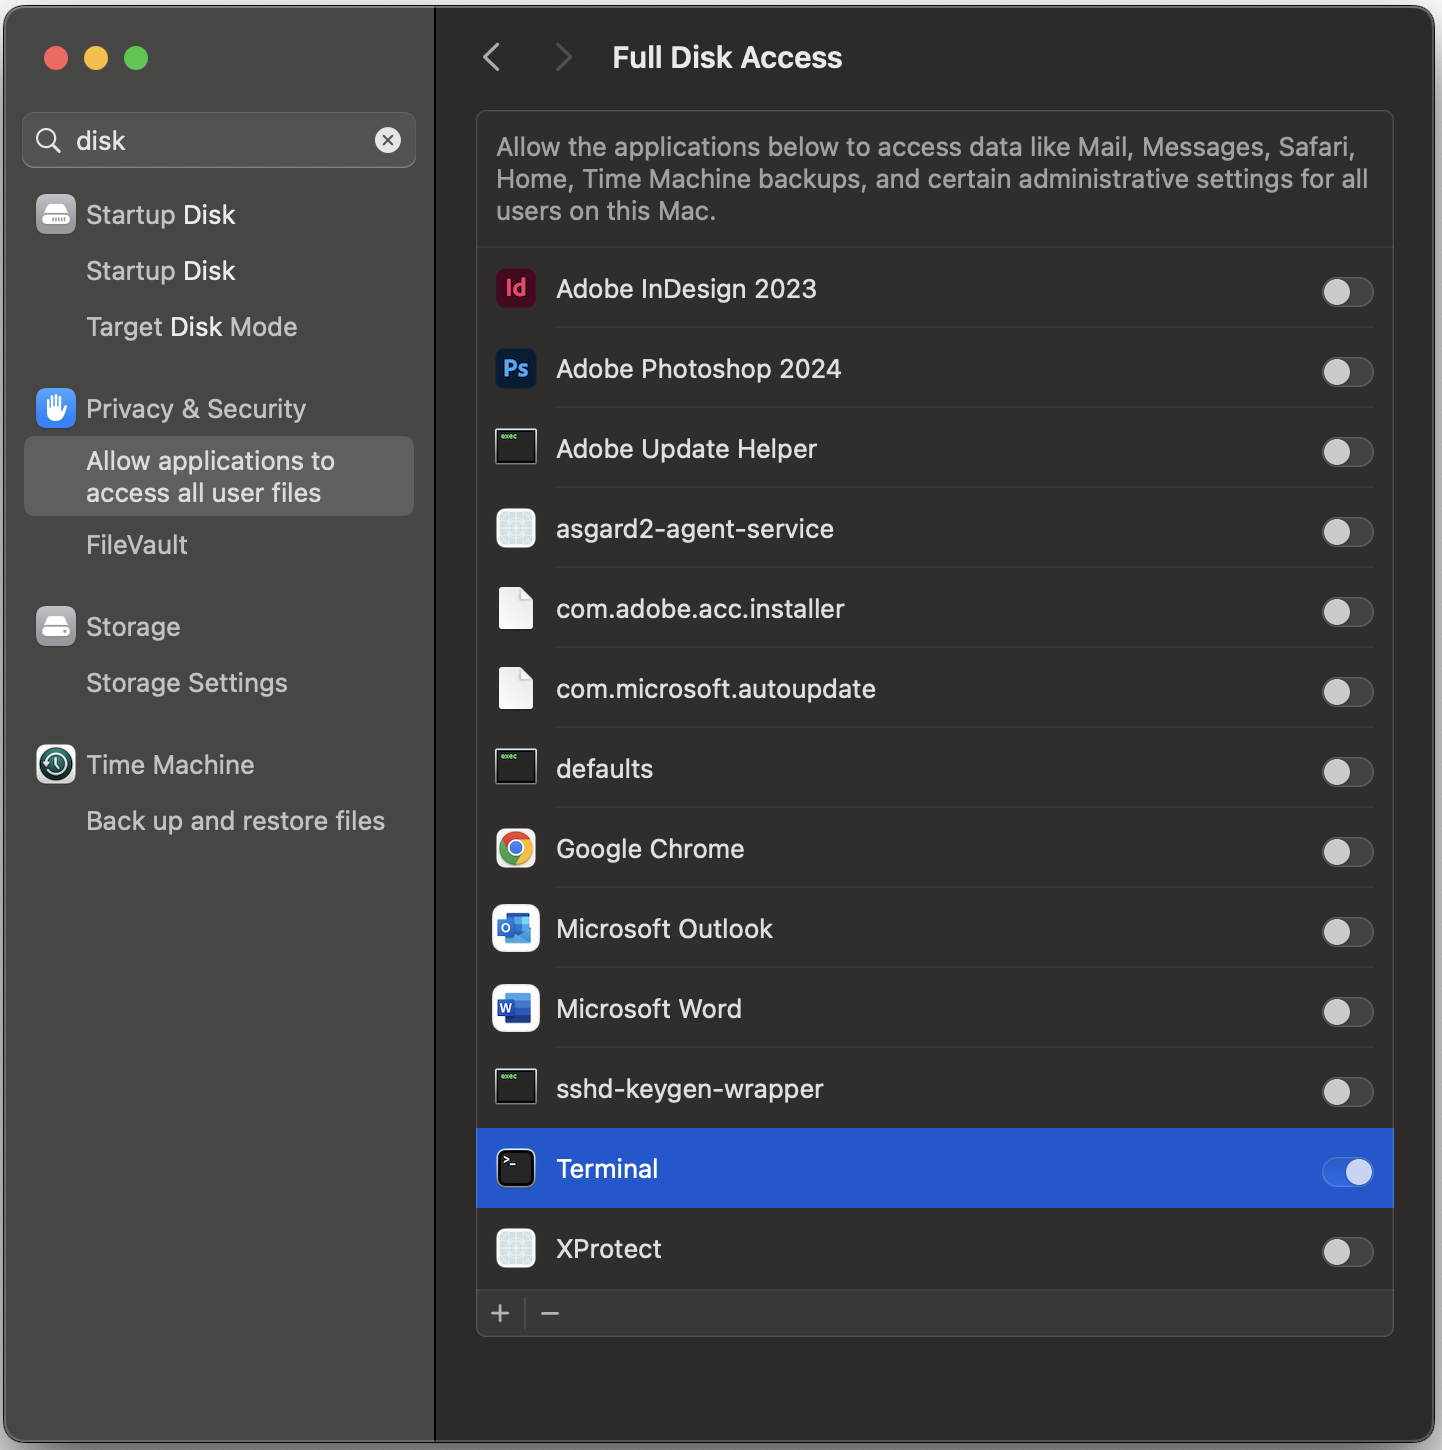
Full Disk Access View
Note
Once your scan is complete, it's strongly recommended to disable Full Disk Access for Terminal and only re-enable it when performing another scan.
3.5. Choose The Right THOR Variant
We offer THOR in different variants.
THOR
THOR TechPreview
THOR Legacy (limited support and compatibility)
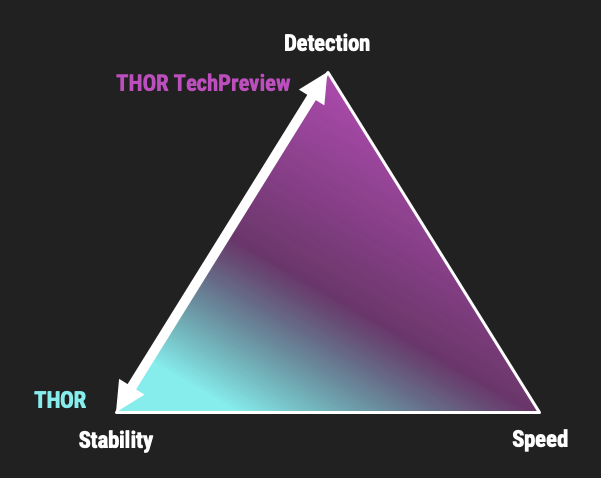
THOR Default and TechPreview Focus
3.5.1. THOR
The default version of THOR is the most stable version, intensively tested and without any broadly tested performance and detection tweaks.
The default version should be used for:
Scan sweeps on hundreds or thousands of systems
Continuous compromise assessments on hundreds or thousands of systems
Systems with high requirements on stability
3.5.2. THOR TechPreview
The TechPreview version is focused on detection and speed. This blog post contains more information on the differences.
The TechPreview version should be used for:
Digital forensic lab scanning
Dropzone mode scanning
Image scanning
THOR Thunderstorm setups
Single system live forensics on systems that don't have the highest priority on stability
You can find the information on how to get the TechPreview version in the THOR Util manual.
3.5.3. THOR Legacy
THOR Legacy is a stripped-down version that includes all modules that can be used on outdated operating systems. This blog post contains more information on the legacy version.
The legacy version lacks:
Diagnostic features of THOR Util
UPX unpacking
ADS scanning
Module: Process scanning
Module: Eventlog scanning
Module: THOR Thunderstorm
Module: ETW Watcher
Module: Task scheduler
HTML report generation
Note
We only offer limited support for this version, since we cannot guarantee a successful stable scan on platforms that have already been deprecated.
To use THOR Legacy, you need a special license. Contact sales to get more information regarding Legacy licenses.
To download THOR Legacy, you can either download it directly from our portal (recommended; continue at step 5), or follow these steps:
Download a normal THOR package (non-legacy)
Use thor-util to download THOR Legacy:
thor-util.exe download --legacy -t thor10-winYou will get a zip file with the following name:
thor-win-10.6.22_<date>-<time>.zipThe content of this zip file should be as follows:
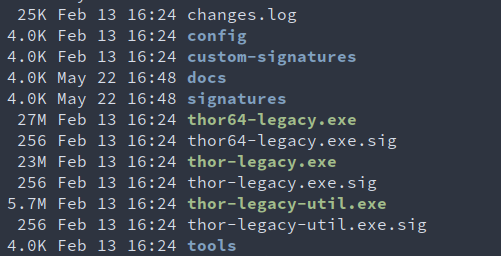
You can now transfer this package to your Legacy system. Please do an upgrade before you start using this:
thor-legacy-util.exe upgradethor-legacy-util.exe updatePlace your Legacy license inside this folder and start using THOR Legacy
3.6. Choose The Right Architecture
You will find a 32 and 64-bit version of the executable in the program folder. Never run
the 32-bit version of THOR named thor.exe on a 64-bit system. The 32-bit version has some
limitations that the 64-bit version doesn't have (memory usage, sees different folders
on disk and registry versions).
Make sure to run the correct binary for your target architecture.
3.7. Choose The Right Command Line Flags
The recommended way to run THOR has already been put into the default. So, the recommended way to start a THOR is without any command line flags.
However, special circumstances can lead to different requirements and thus a different set of command line flags. See chapter Scan for often used flags.
3.8. Add Command Line Completions (optional)
Since version 10.7.15, THOR offers shell completions for browsing the flags. These completions can be generated by using:
thor-linux-64 --completions <bash/zsh/fish/powershell>
This generates a snippet for the specified shell that can be loaded for the current terminal using the following command, depending on your shell:
bash:
source <(thor-linux-64 --completions bash)zsh:
source <(thor-linux-64 --completions zsh)fish:
thor-linux-64 --completions fish | sourcePowerShell:
thor64.exe --completions powershell | Out-String | Invoke-Expression
3.9. Verify Public Key Signatures (optional)
You can verify the executable files in the THOR package with
their digital signature (PE signature) issued by "Nextron Systems GmbH"
thor-util's "verify" feature
openssl verifying the integrity of executables manually
Find more information on THOR Util in its dedicated online manual.
Hint
THOR Util automatically verifies the signatures of the contained binaries in an update package and exits if one or more signatures cannot be verified. You don't have to check them manually unless you distrust the THOR Util itself. In this case, you can use the public key published on our knowledge base.
After downloading the public key the signatures can be manually verified with the following command:
C:\Users\nextron>openssl dgst -sha256 -verify <Path to public key .pem> -signature <Path to signature .sig> <Path to the executable>
Example Windows:
C:\Users\nextron>openssl dgst -sha256 -verify codesign.pem -signature thor64.exe.sig thor64.exe
Verified OK
Example Linux:
user@unix:~/thor$ openssl sha256 -verify codesign.pem -signature thor-linux.sig thor-linux
Verified OK