4. Deployment
This chapter lists different ways to deploy THOR in an environment. Most of these methods are OS specific.
4.1. Licensing
In almost any method of deployment, the provision of valid licenses for the scanners on the endpoints is a core issue. Every license is limited to a certain host name. The only exception are the rare and relatively expensive "Incident Response" licenses.
In all other cases, a valid license has to be generated before a scan run.
There are numerous options to retrieve a valid license for a host.
With ASGARD:
use an ASGARD Agent
download THOR package with license from ASGARD's
Downloadssectiongenerate licenses in ASGARD's web GUI under
Licensing > Generate Licensesuse THOR's
--asgardand--asgard-tokenparameters to retrieve a licenseuse ASGARD's API to retrieve a license manually
Without ASGARD:
generate a license in the web GUI of the customer portal
use THOR's
--portal-keyand--portal-contractsparameters to retrieve a license from the customer portaluse the Customer Portal's API to retrieve a license manually
Some of the options are described in more detail in the following two chapters.
4.1.1. Retrieve Valid License From ASGARD
4.1.1.1. Use THOR's --asgard and --asgard-token parameters
In ASGARD 2.5+ you're able to configure a download token to limit the download of THOR packages and licenses to clients with knowledge of this token. The token is a protection that no one without knowledge of that token can intentionally exceed your license quota limit or retrieve a THOR package without authorization.
The download token can be configured in the Downloads section of you ASGARD server.

Downloads > Download Token Configuration
You can retrieve an appropriate THOR license at the scan start using the built-in --asgard and --asgard-token parameters.
C:\temp\thor>thor64.exe --asgard my-asgard.internal
C:\temp\thor>thor64.exe --asgard my-asgard.internal --asgard-token OCU92GW1CyOJLzaHkGrim1v2O0_ZkHPu0A
If everything works as expected, you'll see an INFO level message in the output that looks like:
Info: Init License file found LICENSE: my-asgard.internal OWNER: Master ASGARD: ACME Inc TYPE: Workstation STARTS: 2021/06/18 EXPIRES: 2022/06/18 SCANNER: All Scanners VALID: true REASON:
4.1.1.2. Use ASGARD's API to retrieve a license manually
You can also script the license retrieval from a local ASGARD server by using the API. The help
box in ASGARD's Licensing > Generate License section shows curl requests that can be used
to retrieve licenses from your ASGARD server.
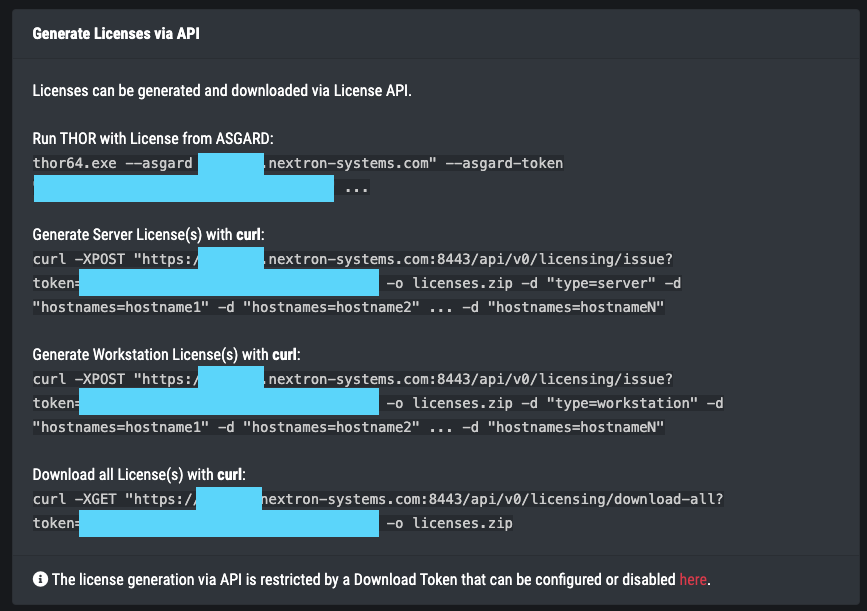
Licensing > Generate Licenses
All you need is:
Hostname
System Type (
serverorworkstation)
Hint
Linux is always using the server license type
If there is uncertainty it's recommended to generate server type licenses which are
more expensive but run on both system types.
For example: To retrieve a valid license for the servers named SRV001 and SRV002
you can use the following command:
nextron@unix:~$ curl -XPOST "https://my-asgard.internal:8443/api/v0/licensing/issue?token=OJCBaTq4VGLjrCes2k4ACCQOzg0AxAoz01" -o licenses.zip -d "type=server" -d "hostnames=SRV001" -d "hostnames=SRV002" ... -d "hostnames=hostnameN"
If you can't use curl and want to retrieve a license as part of a bigger PowerShell script, you can use the following code snippet to help you with the retrieval.
 1# License retrieval script
 2# Florian Roth, June 2021
 3
 4# ASGARD URL
 5$AsgardURL = "https://asgard.nextron-systems.com:8443/api/v0/licensing/issue"
 6$Token = ""
 7$LicenseFile = "licenses.zip"
 8$OutputPath = ".\"
 9$ExtractLicenses = $True
10
11# Config
12# Ignore Self-signed certificates
13[System.Net.ServicePointManager]::ServerCertificateValidationCallback = {$true}
14# Set current working directory for .NET as well
15[Environment]::CurrentDirectory = (Get-Location -PSProvider FileSystem).ProviderPath
16
17# Web Client
18[Net.ServicePointManager]::SecurityProtocol = [Net.SecurityProtocolType]::Tls12
19$WebClient = New-Object System.Net.WebClient
20if ( $Token ) {
21    $AsgardURL = [string]::Format("{0}?token={1}", $AsgardURL, $Token)
22}
23Write-Host "Using URL: $AsgardURL"
24
25# Hostname
26$Hostname = $env:COMPUTERNAME
27
28# License Type
29$LicenseType = "server"
30$OsInfo = Get-CimInstance -ClassName Win32_OperatingSystem
31if ( $osInfo.ProductType -eq 1 ) {
32    $LicenseType = "workstation"
33}
34
35# Proxy Support
36$WebClient.Proxy = [System.Net.WebRequest]::DefaultWebProxy
37$WebClient.Proxy.Credentials = [System.Net.CredentialCache]::DefaultNetworkCredentials
38
39# Prepare request
40$postData=New-Object System.Collections.Specialized.NameValueCollection
41$postData.Add('hostnames',$Hostname)
42$postData.Add('type',$LicenseType)
43Write-Host "Requesting license for HOST: $Hostname TYPE: $LicenseType"
44
45# Request license
46try {
47    $Response = $WebClient.UploadValues($AsgardURL, $postData)
48# HTTP Errors
49} catch [System.Net.WebException] {
50    Write-Host "The following error occurred: $_"
51    $Response = $_.Exception.Response
52    # 403
53    if ( [int]$Response.StatusCode -eq 403 ) {
54        Write-Host "This can be caused by a missing download token."
55    }
56    break
57}
58[System.IO.File]::WriteAllBytes($LicenseFile, $Response);
59
60# Extract licenses
61if ( $ExtractLicenses ) {
62    Add-Type -AssemblyName System.IO.Compression.FileSystem
63    try {
64        [System.IO.Compression.ZipFile]::ExtractToDirectory($LicenseFile, $OutputPath)
65    } catch {
66        Write-Host "The following error occurred: $_"
67    }
68    Remove-Item -Path $LicenseFile
69}
Check the ASGARD helper scripts section in our Github repo for more scripts and snippets.
4.1.2. Retrieve Valid License From Customer Portal
4.1.2.1. Use THOR's --portal-key and --portal-contracts parameters to retrieve a license
To retrieve a licenses from the customer portal, you need a portal key. The portal key
(API key) can be configured in the My Settings > API Key section of the
customer portal.
Important
API functionality needs to be activated by Nextron. Please contact support/sales to activate the API functionality.
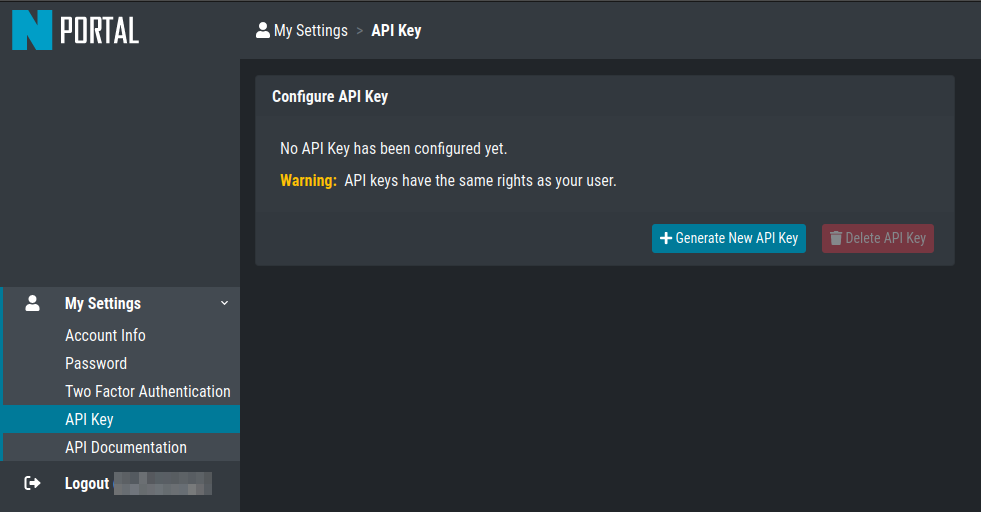
My Settings > API Key
You can retrieve an appropriate THOR license at the scan start using the built-in
--portal-key and --portal-contracts parameters. The --portal-contracts
parameter is optional. It can be used to take licenses from a specific contract in
case you have more than one and want to use a specific one. If none is set, THOR
will automatically retrieve licenses from a contract of the right type. (e.g.
retrieve workstation license from the first still valid contract that has
workstation licenses available)
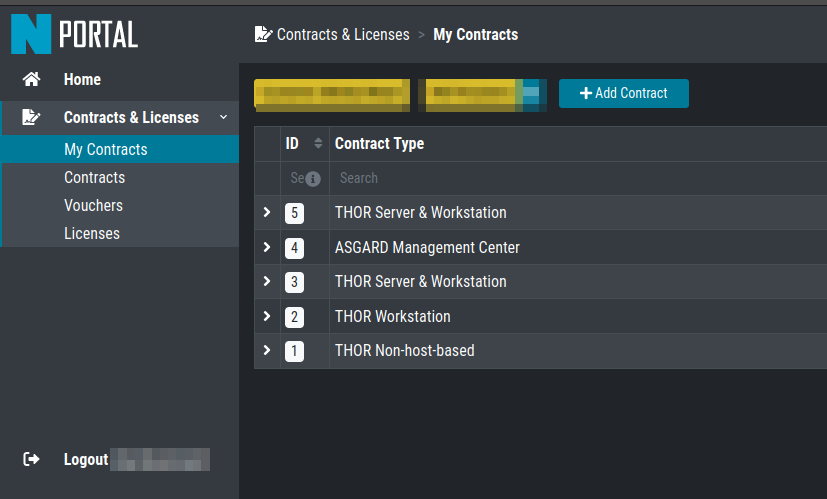
Contract IDs in Customer Portal
You can then use the parameters as shown in the following examples:
C:\temp\thor>thor64.exe --portal-key IY5Y36thrt7h1775tt1ygfuYIadmGzZJmVk32lXcud4
C:\temp\thor>thor64.exe --portal-key IY5Y36thrt7h1775tt1ygfuYIadmGzZJmVk32lXcud4 --portal-contracts 3,5
If everything works as expected, you'll see an INFO level message in the output that looks like:
Info License file found LICENSE: portal.nextron-systems.com OWNER: ACME Inc TYPE: Workstation STARTS: 2021/06/23 EXPIRES: 2021/06/30 SCANNER: All Scanners VALID: true REASON:
You can specify a proxy by setting the HTTP_PROXY and HTTPS_PROXY environment variables, e.g. to my-proxy.internal:3000.
Username and password can be specified as part of the proxy URL as http://username:password@host:port/.
4.1.2.2. Use the Customer Portal's API to retrieve a license manually
This is a bit more complicated as we've decided long ago that our customer portal will never contain personal or otherwise relatable information and this includes any kind of hostnames - not even in memory. Therefore it's necessary to generate a HMAC SHA1 hash of the lowercased hostname on the client side and include only the hash in the request to our customer portal.
This command generates a HMAC SHA1 of the current host you're working on. If you'd
like to generate a license for a different host, simply replace the first part
of the command with echo -n "mycustomname".
nextron@unix:~$ echo -n "$(hostname -s)" | tr '[:upper:]' '[:lower:]' | openssl dgst -binary -sha1 -mac hmac -macopt hexkey:b190dd4a98456999b6d9c7e4e1ac1f231b978c3e7652898d7db2fcdede34613dbc7909c9fc8b3177bb904871b8b7fc7a30cb1582ce9b0089397836dcc209e2d6 | base64 | tr '/+' '_-' | tr -d '='
The values needed for a successful request are:
$CONTRACT= contract id (set to0for automatic selection)$TYPE= [server/client]$HASH= the hash generated from the hostname in the previous step$APIKEY= the API from theUser Settingssection in the customer portal
nextron@unix:~$ curl -XPOST https://portal.nextron-systems.com/api/public/contracts/issue/$CONTRACT/$TYPE/$HASH?download=1 -H "Authorization: $APIKEY" -o license.lic
A valid license is an encrypted blob of at least 800 bytes. You can check the content of the license for possible error message that came back from the server using xxd.
nextron@unix:~$ xxd license.lic
If you find a Error: HTTP-401 in the file, than you've most likely used an invalid API key.
4.2. Network Share (Windows)
THOR is a lightweight tool that can be deployed in many different ways. It does not require installation and leaves only a few temporary files on the target system.
A lightweight deployment option provides the THOR program folder on a read-only network share and makes it accessible from all systems within the network. Systems in DMZ networks can be scanned manually by transferring a THOR program package to the system and run it from the command line. The locally written log files have the same format as the Syslog messages sent to remote SIEM systems and can be mixed without any problem.
We often recommend triggering the scan via "Scheduled Task" distributed
to the systems via GPO or PsExec. The servers access the file share at a
given time, pull THOR into memory and start the scan process. You can
either mount the network share and run THOR from there or access it
directly via its UNC path (e.g. \\server\share\thor.exe or \\server\share\thor64.exe).
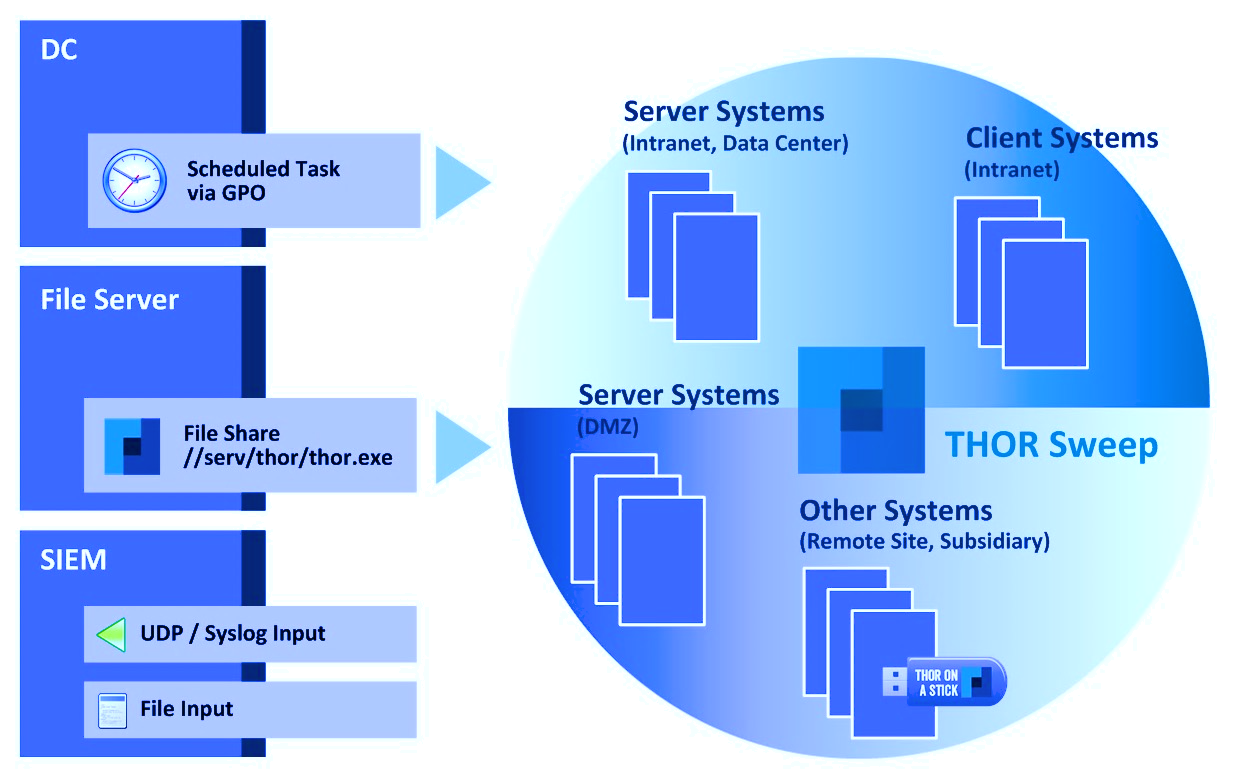
Deployment via Network Share
4.2.2. Create a Scheduled Task via GPO
In a Windows Domain environment, you can create a Scheduled Task and distribute this Scheduled Task via GPO. This Scheduled Task would invoke the batch file on the network share and runs THOR. Make sure that the respective user account has the rights to mount the configured network share.
4.2.3. Create a Scheduled Task via PsExec
This method uses Sysinternals PsExec and a list of target systems to connect and create a Scheduled Task via the command line. This could look like the following example:
C:\temp\thor>psexec \\server1 -u domain/admin -p pass schtasks /create /tn "THOR Run" /tr "\\server\share\thor_remote.bat" /sc ONCE /st 08:00:00 /ru DOMAIN/FUadmin /rp password
4.2.4. Start THOR on the Remote System via WMIC
THOR can be started on a remote system via "wmic" using a file share that serves the THOR package and is readable by the user that executes the scan.
C:\temp\thor> wmic /node:10.0.2.10 /user:MYDOM\scanadmin process call create "cmd.exe /c \\server\thor10\thor.exe"
4.3. ASGARD Management Center (Windows, Linux, macOS)
ASGARD is the central management platform for THOR scans. It manages distributed THOR scans on thousands of systems, collects, forwards and analyses logs. Furthermore, ASGARD can control and execute complex response tasks if needed.
ASGARD comes in two variations: While ASGARD Management Center features scan control and response functions, ASGARD Analysis Cockpit can be used to analyze large amounts of scan logs through an integrated base-lining and case management.
The hardened, Linux-based ASGARD appliance is a powerful, solid and scalable response platform with agents for Windows, Linux and macOS. It provides essential response features like the collection of files, directories and main memory, remote file system browsing and other counteractive measures.
It features templates for scan runs and lets you plan and schedule distributed sweeps with the lowest impact on system resources. Other services are:
Quarantine Service - file quarantine via Bifrost protocol
Update Service - automatic updates for THOR scanners
License Service - central registration and sub license generation
Asset Management Service - central inventory and status dashboard
IOC Management – manage and scan with custom IOC and YARA rule sets
Evidence Collection – collect evidences (files and memory) from asset
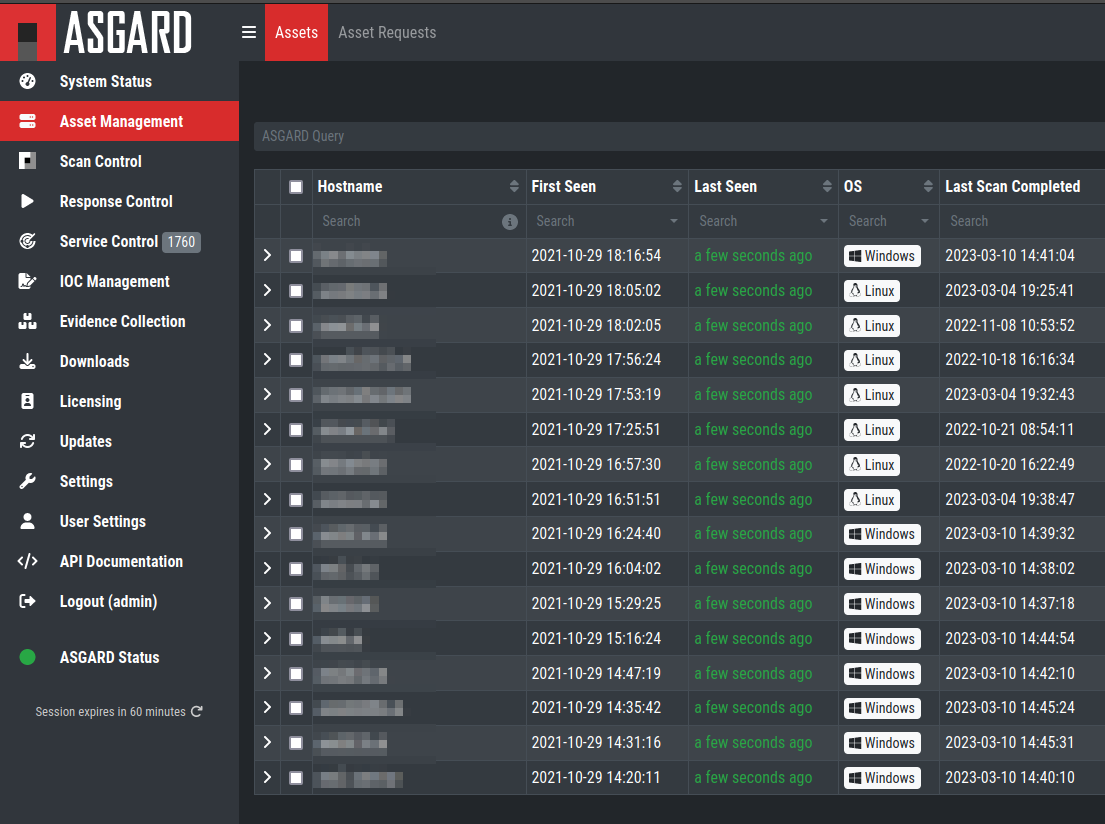
ASGARD Management Center
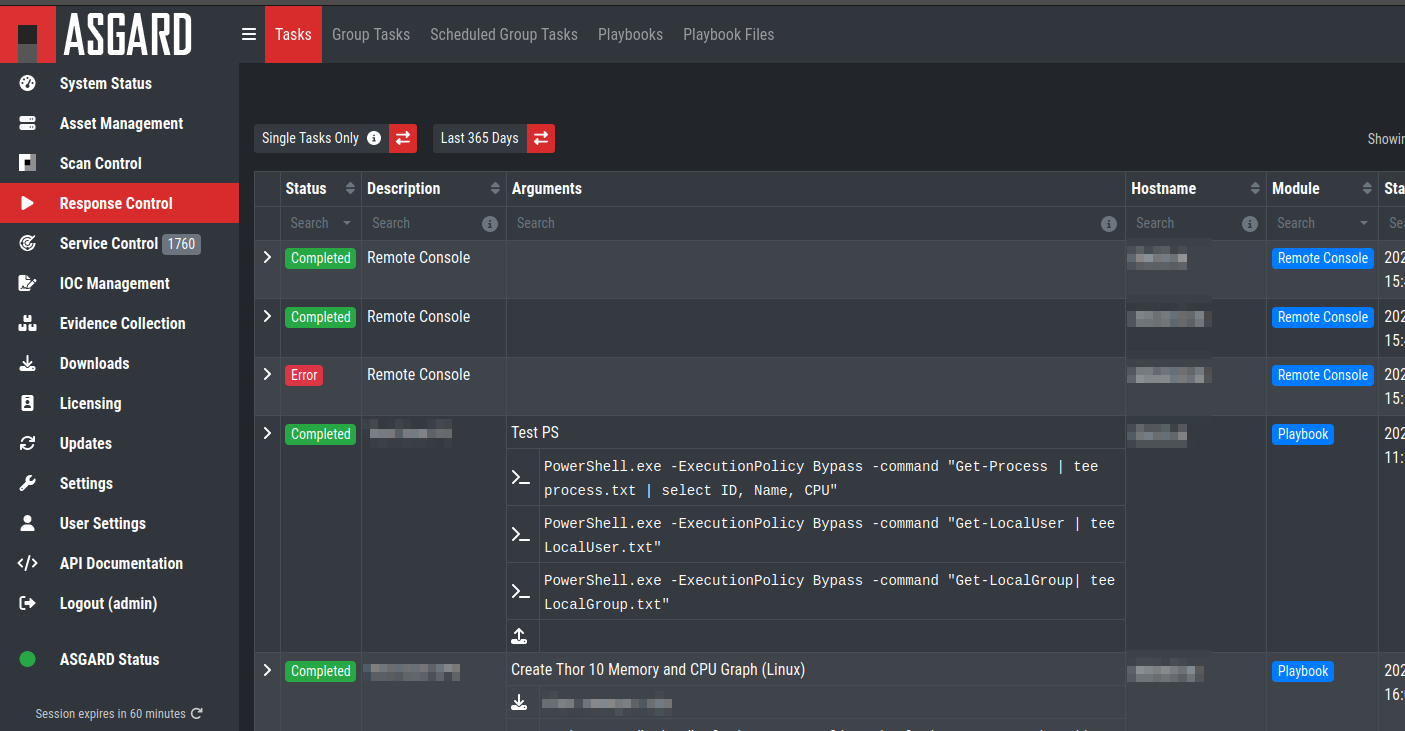
ASGARD Response
4.4. Ansible (Linux)
4.4.1. Distribute Run with Ansible
In practice it is crucial to execute THOR on many servers in a network. A possible way to achieve this is described within this paper, taking into account that the footprint on the target should be minimal and that the procedure should not depend on the used Linux Distribution.
4.4.2. Ansible
The software Ansible (https://www.ansible.com) is a solution to perform tasks distributed over a network on different targets. An Open Source Version is available as well as a version with commercial support for enterprises. Ansible uses SSH to connect to the target hosts and performs a defined set of tasks on them called playbooks. Per default it uses keys for authentication, but this can be setup differently. Please refer to the official documentation for other methods of authentication. The tasks and the targets can be customized using host groups. The host groups may be used to separate different Linux distributions. The other steps may remain the same. Within the playbook any command line option may be customized for the given scenario.
Ansible does parallelization of the tasks by itself. The default amount
of parallel executions is five and can be configured using the -f or
--forks parameter when starting the playbooks.
4.4.3. Execute THOR using Ansible
The following section will show how to use an Ansible playbook to execute THOR on multiple Linux systems.
It will perform following steps on each system:
Create a temporary folder
Mount a RAM drive using the folder as mount point
Copy THOR to this RAM drive
Execute THOR
Unmount the RAM drive
Delete the temporary folder
4.4.4. Inventory File
First it is needed to define a list of hosts to execute THOR on. This is done by setting up a YAML file with the hostnames or IP addresses of the hosts. This file is later used with the -i parameter in the ansible-playbook command. A simple version of this could look like following:
---
host1.com
host2.com
132.123.213.111
To learn more about Ansible inventory files and how to use them, please refer to the official documentation:
https://docs.ansible.com/ansible/latest/user_guide/intro_inventory.html
4.4.5. Ansible Playbook Template
 1---
 2- hosts: all
 3#remote_user: root become: true tasks:
 4- name: Create folder for temporary RAM drive
 5command: mkdir /mnt/temp_ram creates=/mnt/temp_ram
 6- name: Create THOR RAM drive on target
 7command: mount -t ramfs -o size=60M ramfs /mnt/temp_ram/ ignore_warnings: true
 8-  name: Copy THOR to RAM drive
 9copy: src=../thor-linux-pack/ dest=/mnt/temp_ram/ ignore_warnings: true
10-  name: Make THOR Executeable
11file: path=/mnt/temp_ram/thor-x64 state=touch mode="0555"
12- name: Execute THOR
13command: /mnt/temp_ram/thor64 -l /mnt/temp_ram/thor.txt creates=/mnt/temp_ram/thor.html
14- name: Fetch Log file
15fetch: src=/mnt/temp_ram/thor.txt dest=../thoransible-output/{{inventory_hostname}}/thor.txt flat=true
16-  name: Unmount temporary RAM drive
17mount:
18path: /mnt/temp_ram
19state: unmounted
20-  name: check Mount
21command: mount
22-  name: Delete folder for temporary RAM drive
23command: rmdir /mnt/temp_ram/
4.4.6. Usage of THOR's Ansible playbook
Copy the playbook in the main directory of THOR. After this is done it can be started as follows:
nextron@unix:~$ ansible-playbook -f <number_of_parallel_executions> -i <inventory_file> thorplaybook.yml
After the playbook finished running the scans, the output of each system can be found in the thoransible-output directory located at the parent directory of THOR. Therefor it is important that the user starting ansible-playbook has the required rights to write in this directory.
4.4.7. Adjust THOR's Command Line Parameters
Per default this playbook will only start THOR with the parameter that defines the output log file. This can be changed in the playbook in the "Execute THOR"-Task. However, it should be kept in mind, that changing the output log file is not recommended, since the later tasks of the playbook depend on this.
4.5. THOR Thunderstorm Service
The command line flag --thunderstorm starts THOR as a RESTful web
service on a given network interface and port. This service receives
samples and returns a scan result.
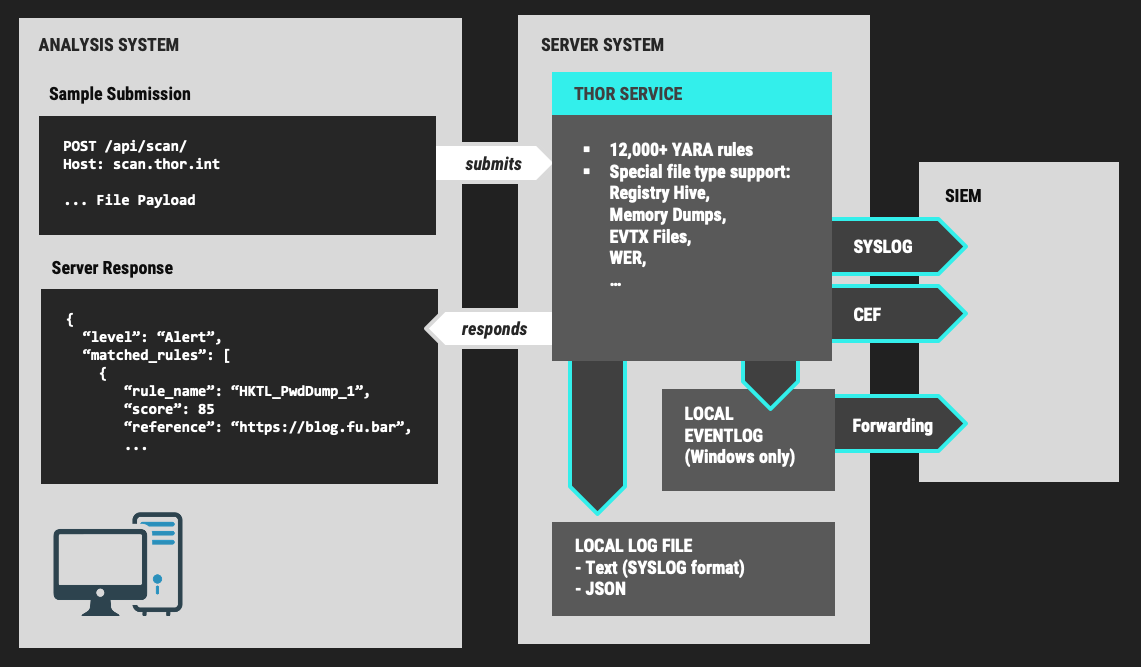
THOR Thunderstorm Overview
The service can be started in two scan modes:
Pure YARA
Full-Featured
In the pure YARA mode (--pure-yara) THOR Thunderstorm only applies
the 13,000 internal and all custom YARA rules to the submitted samples.
It's lightweight and fast.
The full-featured mode is the default. In this mode Thunderstorm also parses and analyses Windows Eventlogs (EVTX), registry hives, memory dumps, Windows error reports (WER) and more. It's not just a YARA scan, but a full forensic processing.
Under normal circumstances, we recommend using the full-featured mode, since most files are not of a type that triggers an intense parsing function, the processing speed should be similar to the “pure-yara” mode.
It is recommended to use "pure-yara" mode in cases in which:
huge forensic artefacts (EVTX or memory dump files) appear on the source systems and overload the Thunderstorm service
deeper forensic parsing, IOC matching or other internal THOR checks aren't needed or wanted
The following table contains all THOR Thunderstorm related command line flags:
Parameter |
Values |
Function |
|---|---|---|
--thunderstorm |
Watch and scan all files sent to a specific port (see |
|
--server-host |
ip-address |
IP address that THOR's server should bind to (default |
--server-port |
port number |
TCP port that THOR's server should bind to (default |
--server-cert |
.crt location |
TLS certificate that THOR's server should use. If left empty, TLS is not used |
--server-key |
.key location |
Private key for the TLS certificate that THOR's server should use. Required if |
--pure-yara |
Apply only YARA signatures (no IOCs or other programmatical checks) |
|
--server-upload-dir |
upload-directory |
Path to a temporary directory where THOR drops uploaded files. Only relevant for Windows and MacOS. On Linux, THOR stores files in in-memory files. (default |
--server-result-cache-size |
number of results |
Size of the cache that is used to store results of asynchronous requests temporarily. If set to 0, the cache is disabled and asynchronous results are not stored. (default |
--server-store-samples |
all/malicious/none |
Sets whether samples should be stored permanently in the folder specified with |
--sync-only-threads |
number of threads |
Number of threads reserved for synchronous requests (only needed in environments in which users use both synchronous and asynchronous mode of transmission) |
--threads |
number of threads |
Number of threads that the Thunderstorm service should use (default: number of detected CPU cores) |
4.5.1. Service License Type
To run THOR in Thunderstorm service mode, you need a special license type named "Service License" that allows this mode of operation.
After the launch of THOR Thunderstorm, we may allow other license types to run THOR in service mode for a limited period of time, so that customers can test the service and its integration into other solutions.
4.5.2. Thunderstorm Collectors
4.5.3. Thunderstorm API Client
We provide a free and open source command line client written in Python to communicate with the Thunderstorm service.
https://github.com/NextronSystems/thunderstormAPI
It can be installed with:
nextron@unix:~$ pip install thunderstormAPI
4.5.4. Thunderstorm API Documentation
An API documentation is integrated into the web service.
Simply visit the service URL, e.g.: http://my-server:8080/
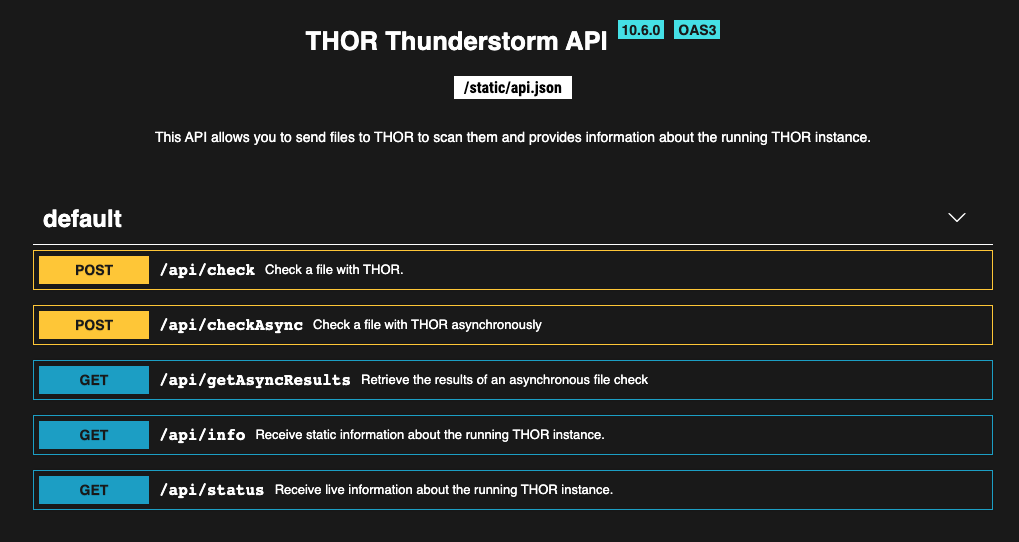
Thunderstorm API documentation
4.5.5. Server Installer Script for Linux
A script that facilitates the installation on Linux systems can be found in our github repository.
The installation of a full THOR Thunderstorm server requires only two steps.
Download and place a THOR Service license file in the current working directory
Run the following command
nextron@unix:~$ wget -O - https://raw.githubusercontent.com/NextronSystems/nextron-helper-scripts/master/thunderstorm/thunderstorm-installer.sh | bash
Warning
Please inspect scripts from the internet before executing them!
Everything else will automatically be handled by the installer script. It even supports an “uninstall” flag to remove all files and folders from the system to get the system clean again after a successful proof-of-concept.
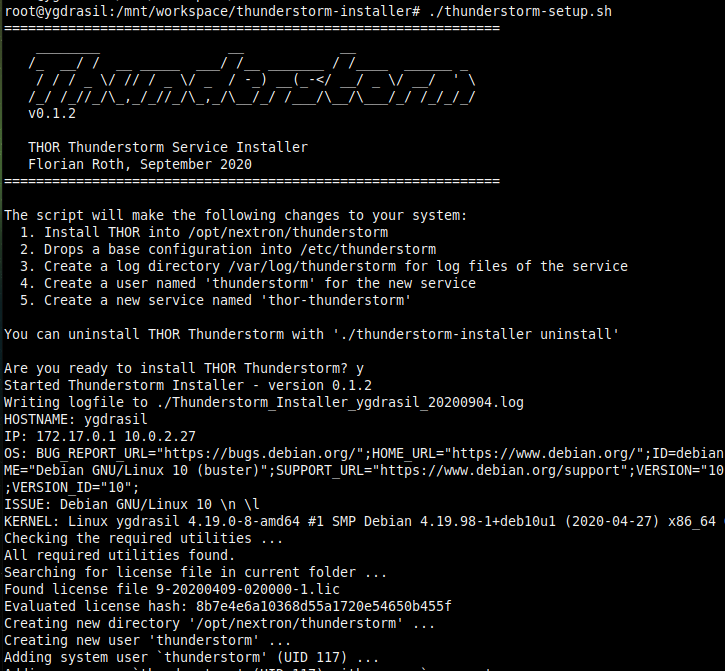
Thunderstorm Service Installer
After the installation, the configuration file is located in
/etc/thunderstorm.
The log file of the service can be found in /var/log/thunderstorm.
4.5.6. Thunderstorm Update
The Thunderstorm service gets updated just as THOR does. Use "thor-util update" to update signatures or "thor-util upgrade" to update binaries and signatures. The service has to be stopped during the updates.
Update signatures:
nextron@unix:~$ thor-util update
Upgrade signatures:
nextron@unix:~$ thor-util upgrade
See the THOR Util Manual manual for details on how to use these functions.
4.5.6.1. Thunderstorm Update Script
The Thunderstorm installer script for Linux automatically places an updater script in the PATH of the server system.
https://github.com/NextronSystems/nextron-helper-scripts/tree/master/thunderstorm
Update binaries and signatures:
nextron@unix:~$ thunderstorm-update
Stop service, update binaries and signatures, restart service:
nextron@unix:~$ thunderstorm-update full
4.5.7. Source Identification
The log file generated by THOR Thunderstorm doesn't contain the current host as hostname in each line. By default, it contains the sending source's FQDN or IP address if a name cannot be resolved using the locally configured DNS server.
However, every source can set a “source” value in the request and overwrite the automatically evaluated hostname. This way users can use custom values that are evaluated or set on the sending on the end system.
nextron@unix:~$ curl -X POST "http://myserver:8080/api/check?source=test" -F "file=@sample.exe"
4.5.8. Synchronous and Asynchronous Mode
It is also important to mention that THOR Thunderstorm supports two ways to submit samples, a synchronous and an asynchronous mode.
The default is synchronous submission. In this mode, the sender waits for the scan result, which can be empty in case of no detection or contains match elements in cases in which a threat could be identified.
In asynchronous mode, the submitter doesn't wait for the scan result but always gets a send receipt with an id, which can just be discarded or used to query the service at a later point in time. This mode is best for use cases in which the submitter doesn't need to know the scan results and batch submission should be as fast as possible.
Synchronous |
Asynchronous |
|
|---|---|---|
Server API Endpoint |
/api/check |
/api/checkAsync |
ThunderstormAPI Client Parameter |
--asyn |
|
Advantage |
Returns Scan Result |
Faster submission |
Disadvantage |
Client waits for result of each sample |
No immediate scan result on the client side |
In asynchronous mode, the Thunderstorm service keeps the samples in a queue on disk and processes them one by one as soon as a thread has time to scan them. The number of files in this queue can be queried at the status endpoint /api/status and checked on the landing page of the web GUI.
In environments in which the Thunderstorm service is used to handle synchronous and asynchronous requests at the same time, it is possible that all threads are busy processing cached asynchronous samples and not more synchronous requests are possible.
In this case use the --sync-only-threads flag to reserve a number of
threads for synchronous requests. (e.g. --threads 40
--sync-only-threads 10)
4.5.9. Performance Tests
Performance tests showed the differences between the two submission modes.
In Synchronous mode, sample transmission and server processing take exactly the same time since the client always waits for the scan result. In asynchronous mode, the sample transmission takes much less time, but the processing on the server takes a bit longer, since the sever caches the samples on disk.
Synchronous |
Asynchronous |
|
|---|---|---|
Client Transmission |
40 minutes |
18 minutes |
Server Processing |
46 minutes |
|
Total time |
40 minutes |
46 minutes |
4.5.10. SSL/TLS
We do not recommend the use of SSL/TLS since it impacts the submission performance. In cases in which you transfer files through networks with IDS/IPS appliances, the submission in an SSL/TLS protected tunnel prevents IDS alerts and connection resets by the IPS.
Depending on the average size of the samples, the submission frequency and the number of different sources that submit samples, the transmission could take up to twice as much time.
Note: The thunderstormAPI client doesn't verify the server's certificate
by default as in this special case, secrecy isn't important. The main
goal of the SSL/TLS encryption is an obscured method to transport
potentially malicious samples over network segments that could be
monitored by IDS/IPS systems. You can activate certificate checks with
the --verify command line flag or verify parameter in API
library's method respectively.
4.6. THOR Remote
THOR Remote is a quick method to distribute THOR in a Windows environment. It has been developed during an incident response and can be considered as a clever hack that makes use of PsExec to push and execute THOR with certain parameters on remote systems.
Requirements:
Administrative Domain Windows user account with access rights on the target systems
Reachability of the target systems (Windows Ports):
135/tcp for SCM (Service Management)
445/tcp for SMB (Mounting)
A list of target systems
Advantages:
Agent-less
Comfortable scanning without scripting
Quick results (useful in incident response scenarios)
Disadvantages:
Requires reachability of Windows ports
User credentials remain on the target system if it is used with explicit credentials (NTLM Auth) and the users doesn't already use an account that has access rights on target systems (Kerberos Auth)
4.6.1. Usage
A list of parameters used with the remote scanning function can be found in the help screen.

THOR Remote Usage
As you can see, a list of target hosts can be provided with the help of the new YAML config files. See chapter Configuration for more details.
A YAML file with a list of hosts looks like this:
remote:
- winatl001.dom.int
- winatl002.dom.int
- winnyk001.dom2.int
You can then use that file with:
C:\nextron\thor>thor64.exe -t targets.yml
4.6.2. THOR Remote Licensing
Valid licenses for all target systems are required. Place them in the
program folder or any sub folder within the program directory (e.g.
./licenses). In case of incident response licenses, just place that
single license in the program folder.
You don't need a valid license for the system that runs THOR's remote scanning feature (the source system of the scans, e.g. admin workstation).
Hint
You can pair THOR Remote with the License Retrieval options available within THOR, to make deployment easier.
4.6.3. Output
The generated log files are collected and written to the folder
./remote-logs
The "THOR Remote" function has its own interface, which allows you to view the progress of the scans, view and scroll through the log files of the different remote systems.


THOR Remote Interface
4.6.4. Issues
4.6.4.1. System Error 5 occurred – Access Denied
4.7. Distribute to Offline Networks / Field Offices
The quickest and most simple way to run THOR is by providing the ZIP archive to the colleagues in the remote location, letting them run the THOR executable and collect the report files afterwards.
The most usable format in this use case is the HTML report if only a few reports have to be analyzed. If the number of collected reports is high, we recommend using ASGARD Analysis Cockpit or Splunk with the free App and Add-on.
ASGARD Analysis Cockpit: https://portal.nextron-systems.com/webshop/downloads
THOR APT Scanner App: https://splunkbase.splunk.com/app/3717/
THOR Add-On: https://splunkbase.splunk.com/app/3718/
4.8. System Load Considerations
We recommend staging the THOR Run in order to avoid resource bottlenecks (network or on VMware host systems). Especially during the THOR start, program files and signatures get pulled over the network, which is about 30 MB per system. Additionally, the modules, which take only a few seconds or minutes to complete, run first so that the load is higher during the first 10 to 15 minutes of the scan.
It is therefore recommended to define sets of systems that will run at the same time and let other systems start at intervals of an hour.
It is typically no problem to start a big set of physical machines at the same time. But if you start a scan on numerous virtual guests or on remote locations connected through slow WAN lines, you should define smaller scan groups.